Preamble
(if you rate this I would like to read your comments about your rating)
I was originally going to write this post and cover 2 or 3 different UI prototyping tools with Balsamiq being one of them. Well, as I started working with Balsamiq I realized that I wanted to spend more time working with each tool so I decided to make this a mini-series of a sort with Balsamiq in Part 1 with ForeUI in Part 2 and an unknown (even to me) in Part 3. So here we go with Balsamiq (this is not a tutorial but more of a review so I encourage you to explore the help file for all the capabilities here).
FYI: Real nice thing in this day of most software vendors requiring a license per machine and sometimes per use Balsamiq allows you to use your license on every machine you own. As they say in the FAQ: “The license for Mockups for Desktop is tied to you, not a particular machine. Install it on any machine you own and use, and enjoy!”
Update: Balsamiq has been updated to v1.8.5 on 06.22.2010 (release notes).
Let me preface this review of mine by saying it is a review of how I see the program and how it felt working with it as well as my impressions from a software developer point of view. This is not some indirect advertising or some way to push more business to Balsamiq as I am actually using this tool in my work while I doing UI designs for the software I am developing. Enough said.
Finally, here’s some links for Balsamiq:
I did not include a great many screen shots of what Balsamiq can do as their website really has this covered much better than I do from the Sample Mockups link just above.
Contents
Looking Around
Before I display my little mockup I figured I would go over some parts of Balsamiq and give my impressions.
General
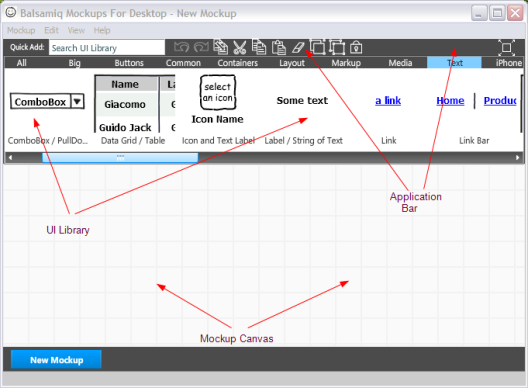
I really like the clean look of this program. It’s snappy, lot’s of room for composition and there is not a lot of clutter (ie.. there are no multiple sidebars, bottom bars, etc). The Application Bar above the UI Library is interesting to me coming from mostly a Windows background (being used to toolbars) but it’s simple and workable. I like the tools there but it would be nice to be able to move it around. In fact, I would like to be able to dock the Application Bar, UI Library and Properties myself but perhaps that’s on a future version?
The menus are nice and short though a menu option for configuration would be nice (see Configuration below).
The UI Library slide menu is very responsive and the drag and drop is precise and crisp when dragging onto to Mockup Canvas. I also like the wide array of control types though I don’t quite understand the iPhone specific controls as the overall wire frame concept implies that the mockup is OS or Device independent but that’s just me and the controls themselves, as well as any others I might not use myself, would probably be valuable to others.
Application Bar
The Application Bar contains some common actions such as cut, copy, paste, delete, control grouping and locking. What I wish it had was the layer buttons (bring forward, send backward, etc) since it appears that those buttons exist on the Properties page for just about every control I worked with. I would also be nice if the color pallete was available from the Application Bar.
UI Library
This is a great way to present the controls. I like the preview of the controls and I like how responsive the navigation is within the library. What I see that would be beneficial to me is to have a split level button for the control groups (ie.. Big, Navigation, iPhone, etc) that I could click on to see a drop down menu of what each group contains and clicking on an item in the menu would take me to that item in it’s group – just a thought..
Canvas
Not a whole lot to say about the Canvas itself. It works very well, I don’t notice much if any lag when I am composing a mockup and that’s important to me since I tend to like to work fast when I have an idea (maybe it’s just poor short term memory!). Anyway, if I could have one thing it would be rulers: I know it’s probaly not a pure mockup tool but sometimes I want to ensure that my mockup will fit on a page if I print it – trivial I know but some things you get used to.
Properties
This IS a part of the Canvas but I had a few things I wanted to comment on with the properties. First, it seems there is a lot of redundancy such as the layering buttons, color, transparency to name a couple. It would be really cool if the Properties were dockable with the option to slide out on mouse hover. Then the common properties from the Properties window and maybe some from the Application Bar could go into a common properties section and then the custom properties unique to each control could go in a unique properties section just below the common properties – similar to this:
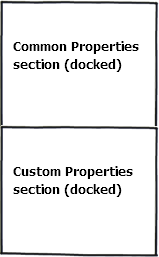
The Properties Window shows semi-transparent when I click on a control on the canvas and I have to click on the properties window itself to see what properties are available. That’s kind of a bummer after a while and I am uncertain as to the value of that type of display when I have clicked on the control. I am ok with the properties hiding itself after a bit but I still like the idea of having a properties area like the one I mocked above (it would not have to be docked permanently, just have the option to do so).
Working with Images
Here I am, looking for a way to import images, and could not find an obvious way (ie.. File | Import Image..) to do so. Then, being so smart, I actually went and read the online help and found out that images are easy to import in a rather cool way: You use the Image control and once you drag it onto the mockup you can import through the control’s properties from your local drive, a URL or from Flickr. Very simple and very cool! I really liked the Sketch It feature which renders the image with a similar look to the rest of the mockup controls (not exact because you have more OS specific look with your screenshots but for other non OS images it’s nice).
Configuration
Most programs you work with have a configuration dialog that helps you to set your preferences for that program. With Balsamiq, you have to create this file for yourself as it does not appear to exist by default after installation. It would be nice if there were a default config with a nice dialog to modify the settings from the UI.
Here is my config that I used on Windows: BalsamiqMockups.cfg
<config>
<fontFace>Tahoma</fontFace>
<rememberWindowSize>false</rememberWindowSize>
<useCookies>true</useCookies>
</config>
The config is pretty simple and self-explanatory so the only thing I would say is choose your font wisely and that’s only from the standpoint of working with existing mockup’s. I had a sample I was working with that had the font in Comic Sans and then I created the config and changed the font to Lucida Console for fun and I had to re-arrange everything. No real big deal and no different than if you change fonts in any drawing tool so it’s just something to be aware of.
Here is the info on the config
Exporting and Importing
Exporting is pretty straightforward with the option to export the current mockup to .png or all open mockups to .png. There is no option to choose the location or filename of the exported .png for a single export but the export all does allow you to pick the folder. The .png names are derived from the name of your mockup. I would actually like the option to choose so I could have different names for the exported .png files. Balsamiq DOES give you the option to create a sequentially named file if the export exists already so that is good.
The Export to Clipboard creates a snapshot of your mockup and puts it in the clipboard. I tried this with Paint.Net and it worked perfectly. The image was clear and exact.
If you want to get the xml representation of your mockup you can Export Mockup.. and Balsamiq will copy the xml to the clipboard in text format suitable for pasting in to an editor (the xml is in what is called .bmml format).
Importing was an interesting experience. The way I understand importing is that you can import a .bmml into your current mockup as long as the .bmml file resides in the same folder as the current mockup. Alternatively, you can paste the xml (.bmml format) into a text box and import that way. I am uncertain if Adobe Air creates this kind of restriction or if it is by design but I can tell you that I am certain I will have .bmml files in various places on my system and I don’t always want to copy them around to current working folders. This needs a file selection dialog similar to what the Image Control can do.
Here is the info on Exporting and Importing
Integration
Integration is often where a lot of products fail, especially with collaboration tools. In this, Balsamiq really excels in it’s integration. According to what I read, you can have full blown integration into Confluence, Jira, XWiki and FogBugz. This means that you don’t have to use the desktop version of Balsamiq and import images from your mockups as you can create them from within the aforementioned collaboration tools. That’s a very cool thing.
Here’s the info on Integration (starting with Confluence – scroll down on the help page to read more).
What I Did
Here are some screen shots of a mockup I did with Balsamiq. I admit it’s not as interesting as a real project might be but it will have to do…for now:
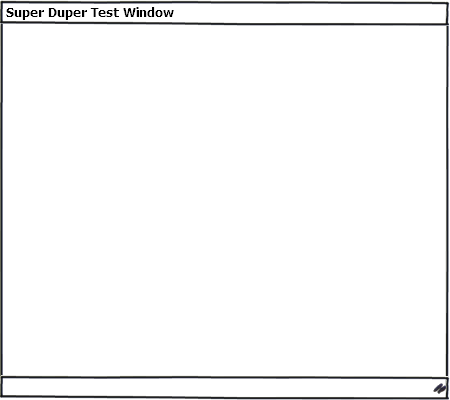
Just getting started, dragged a window to the canvas:
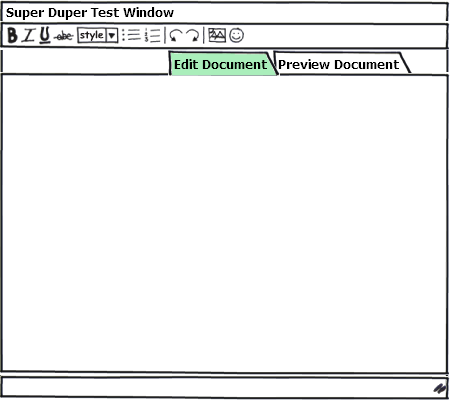
Now we have a toolbar and a tab control:
The treeview is in place:
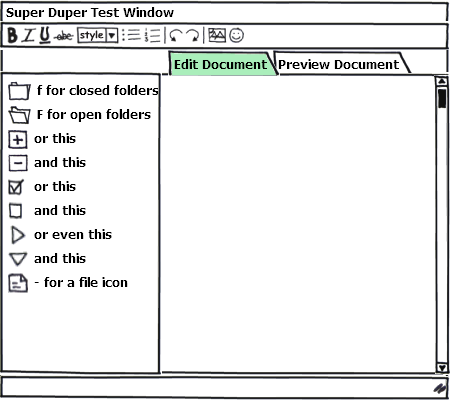
Finally, the textbox and content on the right:
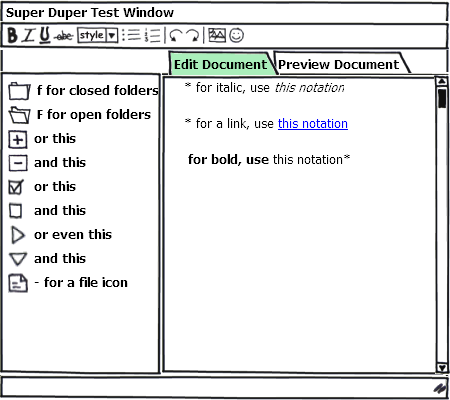
So, I am quite sure that this was a simpleton’s sample but it gives you some idea of what you can do in about 10 minutes but the results are well worth it.
Off the Top
Things I liked
What I think really makes this program work for me.
I liked the overall UI a great deal. Despite some issues I might have it is still extremely productive.
I liked how little time it took me to produce so much.
I liked the large array of controls and Balsamq’s willingness to create more – just contact them and see what they say.
I liked how cool the Image Control was (is) for importing images – excellent!
I liked how responsive this program was (is!). It’s very refereshing after working with some really speed hogs like Visual Studio.
I liked the integration features with Confluence, Jira, Xwiki, and FogBugz.
I liked a lot more things but I think this is a good start.
Things I could like
Some things that would be cool (to me) if they existed (if I missed something please tell me!) in Balsamiq – some of the items I might have mentioned already.
I could like it if the vertical curly brace control would show the text I just typed after I am done. It seemed that I had to resize the object on the canvas and then it displayed fine.
I could like it if there were some line connection tools for annotation purposes similar to how dia does it or any other drawing tool for that matter. I realize this might go against purist mockup thinking but many manual mockups I have done on paper always get arrows and lines pointing to the UI elements. Just a thought…
I could like it if I could see a ruler along left and top.
I could like it if there was some rudimentary color formatting of the text in text type controls such as text area. Some basic formatting exists in the controls with text editing in them such as Italics, Bold, and Links to name a few but I sometimes like color in my mockups (I used to use Paint.Net or Gimp so I am spoiled where color comes in) to draw attention to content that may be important to the project.
I could like it if there was an option to choose the location and filename of the .png I was exporting to.
I could like it a lot if Balsamiq generated XAML (.Net WPF) and/or MXML (Flex) – that would be so cool!
Recommendation
So, here we are, at the end of this little review. I hope I communicated the sharpness of Balsamiq and it’s focus towards one thing: creating UI mockups. This program, so far, is about the best thing that I have found to do mockups in a long time including Visio, SmartDraw or Dia (and I have used all of these). I really think that Balsamiq, the company, is on the right track with this product and with some enhancements or changes it would just keep getting more popular.
Sigh.. I am not so good at writing a lot of fluff so to tell it like I say it: This is a cool program and I don’t think I will use anything else except for my brain doing mockups in the future and while you can’t beat the collaborative integration the desktop version is great.
If you have to do UI mockups for clients this is a great way to go.
Side: I was going to write a separate post about mockup magnets (called GuiMags) but that’s been done here. So I thought I would entice your thought processes by mentioning you can get coated, magnetized, UI shapes for the ultimate manual UI design process. You can write on them like a white board and best of all you can reuse them! Here is the site where you can get GuiMags (as well as GuiBoards). Check it out as a compliment to your digital mockups!
Stay tuned for UI Prototyping and Mockups Part 2 – ForeUI.
Tab

Would you like me to do a review of Moqups?
Would you like me to do a review of DesignerVista?
DesignerVista mockup is an excellent mockup tool that you may want include in the checklist.
http://www.designervista.com
Have you guys seen Moqups yet?
It’s a nifty HTML5/SVG App used to create wireframes/mockups! Check it out https://moqups.com